
Instructions for Setting Up a Crystal Report in Business Vision
1. Copy the report (___.rpt) into the Custom Reports directory on your server. This is usually located on the server (example: F:\BV\Custom Reports).
2. In BusinessVision, access the Reports Menu. Select the module in which you want to run the report, such as Order Entry, Inventory, or Sales Analysis.
3. Click on the Custom Reports Tab.
4. Click on the ‘New’ button. The following screen should appear:
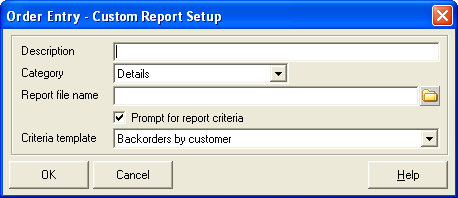
5. Fill the fields in as follows:
a. Description: A meaningful name for the report which users will see.
b. Category: Leave as Details
c. Report file name: Click on the yellow file folder icon; navigate to the report which you just copied into the Custom Reports folder.
d. Check or uncheck the ‘Prompt for report criteria’ as directed (by me)
e. Criteria template: Select the appropriate template; this will be grayed out if the line above is unchecked.
6. Click OK to save the report setup.
7. The answer to the next prompt: ‘Do you wish to provide access to the report to all users’ will depend on the nature of the report. You can either click yes and have all users be able to run the report, or you can click ‘No’ and assign the permissions through the System Manager/User details menu.

Hi, thank you for sharing, it is very helpful. I’d like create new Aged detail AP report, because the original one doesn’t show the vendor’s terms and due date, would you please tell me how to do it?
Hi Lilly
You would need to understand Crystal Reports in order to be able to add those fields. You can access the report using Crystal via BV (File, Printer Setup, Report Designer) but it’s quite complex. If you would like me to customize the report for you, please send me an email at rita.bloem@rogers.com.
Rita